

Well, now that it's going to start officially getting hot out here in Kansas land, I feel like it's time to start the summer looks! Sunset eyes can be worn at anytime, but they just feel totally appropriate for the summer since the colors are so warm. Keep reading to see how to achieve this look!

Eyes:
1) Tarte Clean Slate 360 Creaseless Eye Primer
2) NYX Jumbo Eye Pencil in Milk
3) Sugarpill Burning Heart Palette - Sugarpill also sells all of these colors as singles; they are Poison Plum, Love+, Buttercupcake, Flamepoint. You can find Sugarpill at Sugarpillshop.com or Beautylish.com
4) Stila Trio - I used Kitten and Espresso, so ignore the shade in the middle
5) Stila Stay All Day Liquid Liner
6) Lancôme Hypnôse Star Mascara

Face & Lips:
1) Too Faced Milk Chocolate Soleil Bronzer
2) Milani Baked Blush in Luminoso
3) Jordana Easyliner in Tawny
4) Revlon Lip Butter in Crème Brulée

Tools:
**FYI, I used a lot of brushes because I used 5 different colors of eye shadows. You do not, by any means, need to use these exact brushes, I just wanted to keep my colors are pure as possible for this tutorial**
1) Smashbox Shadow Liner Brush
2) Sephora Broad Brush (I genuinely have no idea what this brush is actually called... it came in a kit)
3) Missha Medium Base Brush
4) Sephora Professionals Small Shadow Brush
5) Sephora Pencil Brush
6) MAC Pencil Brush (#219) - This is what a real pencil brush should look like, the Sephora one is weird, but it works well for blending a precise area
7) Bare Minerals Dial Ended Brush

Foundation face! I'm using my normal Laura Mercier foundation today and that zit on my cheek is finally starting to heal... but it's turned a lovely red shade, so it's nice and obvious.

Primed eyelid!

I applied Milk directly from the pencil and then blended out with my ring finger. You can use a brush to blend if you prefer not to use your fingers.

I applied Buttercupcake with my Missha brush to the inner half of my lid up to the socket (I have small lids, so that is actually where my socket is... unfortunately for me).

I then took my Sephora small eye shadow brush and pressed in Love+ on the outer half of my lid.

I took the eye shadow end of my Bare Minerals brush and blended Flamepoint into the center of the lid and up into the crease/socket area.

I blended out Flamepoint a bit more and then taking my MAC 219, I added Poison Plum in my outer V.

And blended!

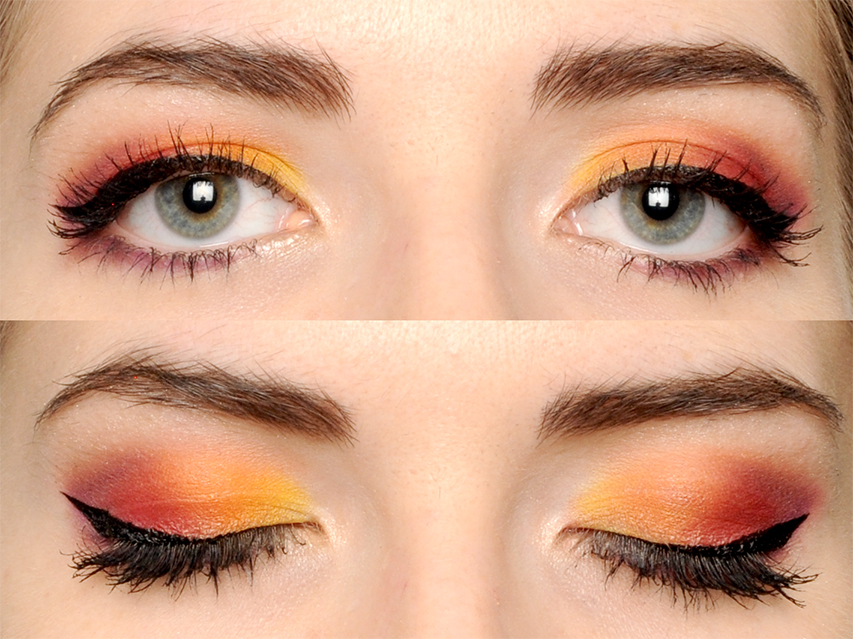
Here we are with both eyes pre liner and mascara.

I added my black winged liner (because I love dramatic eyes... :D) and put Kitten on my brow bone and inner corner of my eye. I also blended the top of the eye shadow with Kitten to make it look a bit more natural (I applied Kitten with the weird broad Sephora brush).
I filled my brows with the Smashbox brush and Espresso by Stila. I kind of want to say something about my eyebrows because I feel like I need to. I like filled in, very stylized brows, but I do not like them on me. I have a long thin face and when I make my brows very "perfect" and shaped and completely filled in, I feel like I look like a drag queen. Lots of beauty folk fill their brows in completely, but I prefer to keep mine looking a little wild. It's just a preference thing, but one of these days, I'll do a tutorial on how to fill your brows for those of you who would like a more polished look.

I added Milk Chocolate Soleil in the hollows of my cheeks, around my hair line, my temples, and my chin. I then took Luminoso and applied it to the apples of my cheeks.

I wanted to keep my lips fairly natural looking, so I filled them with Jordana Easyliner in Tawny since it's close to my natural lip color and then went over them with the Lip Butter in Crème Brulée.

And with my hair down. Now, time for some narcissism on my part because I really loved this look.


And there you have it! Would you guys try this look out? Let me know in the comments down below!
(all photos copyright Allison Richardson Photography and not available for use without permission)
No comments:
Post a Comment